Changing a Jira issue type seems like a simple dropdown click, but it's rarely that easy. What looks like a minor edit can impact workflows, custom fields, and reporting. Get it wrong, and a single Jira change issue type operation can corrupt your project's data. This guide provides actionable steps to do it right.
Why Changing an Issue Type in Jira Is Never Just One Click
Changing an issue type is reclassifying a piece of work. A small Task becomes a full-blown Story. A customer-reported Bug turns out to be a request for a new Feature. These adjustments are a normal part of agile development.
However, in Jira, an issue type is more than just a label. It's the anchor for critical project settings:
- Workflows: A
Bugfollows a "Triage," "Fix in Progress," and "Ready for QA" workflow. AStoryfollows a "Backlog," "In Development," and "Done" path. Changing the type means you must map the issue to a new workflow. - Fields: An
Epichas an "Epic Name" field that aTaskdoesn't. When you switch, you must decide what happens to data in fields that don't exist on the new issue type. - Permissions: Specific teams may have permission to edit certain issue types. Changing a
Bugto aStorycould require a handoff between your support and development teams. - Reporting: Your dashboards and reports are filtered by issue type. A miscategorized issue will throw off key metrics like team velocity or cycle time.
The Real-World Impact of Mismatched Issue Types
When a team member logs a new feature as a simple Task, it sets the wrong expectations and often leads to rework. In the US market, which accounts for 33.56% of Jira's website traffic, some teams see rework rates hitting 30% due to improper issue typing.
Worse, projects that require mid-sprint issue type changes often see resolution times increase by 15-20%. That's a direct hit to your delivery schedule. You can find more about these Jira statistics and their impact on team productivity.
The decision to change an issue type isn't just admin cleanup; it's a strategic move that realigns the work with the correct process. Getting it right saves a ton of confusion later and makes sure the issue follows the right path to get done.
This image shows how reports, fields, metrics, and workflows are all tied directly to the issue type field.
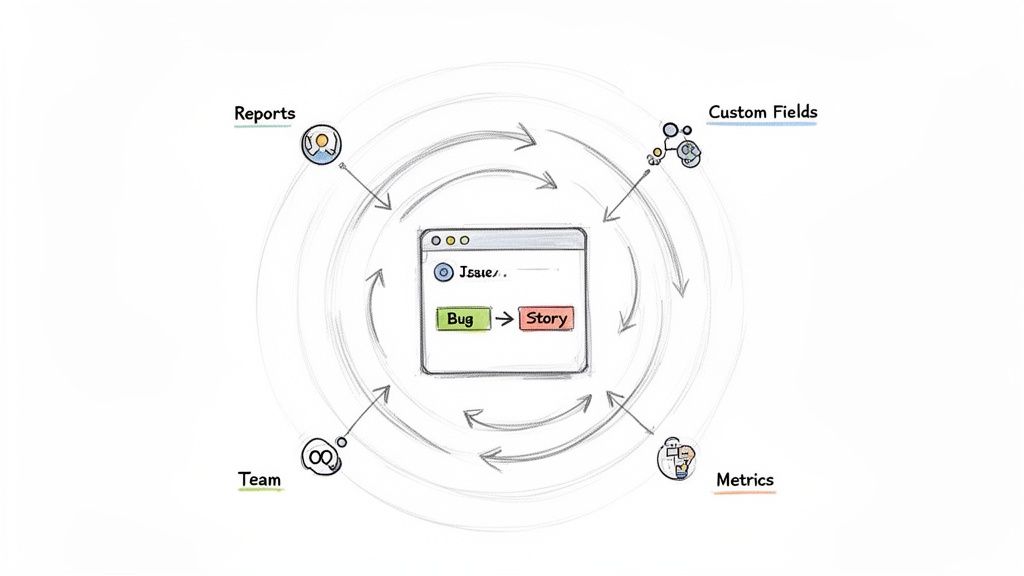
Swapping a "Bug" for a "Story" isn't an isolated change. It forces you to rethink how that work moves through its lifecycle and how you capture its data. To run a clean, efficient, and accurate Jira instance, you have to master this process.
The Right Way to Change a Single Issue Type
Changing an issue's type in Jira is a common task. To do it correctly and protect your data, use Jira's built-in migration wizard. It ensures you don't lose critical information when shifting an issue between different configurations.
Here's how to change a Bug into a Story. A customer support ticket, "DEV-123 User cannot export report," is not a glitch but a feature request. To get it on the development team's radar, you need to change its type to Story.
Finding the "Move" Operation
You won't find a "Change Type" dropdown on the issue screen. Jira considers this a "move" because you are shifting the issue between different sets of rules—workflows, fields, and screens—even if it stays in the same project.
- Open the issue you need to change (e.g., DEV-123).
- Click the actions menu (•••) in the top-right corner.
- Select Move. This starts the change wizard.
If you can't click Move or don't see the option, it's a permissions problem. Contact your Jira admin for help.
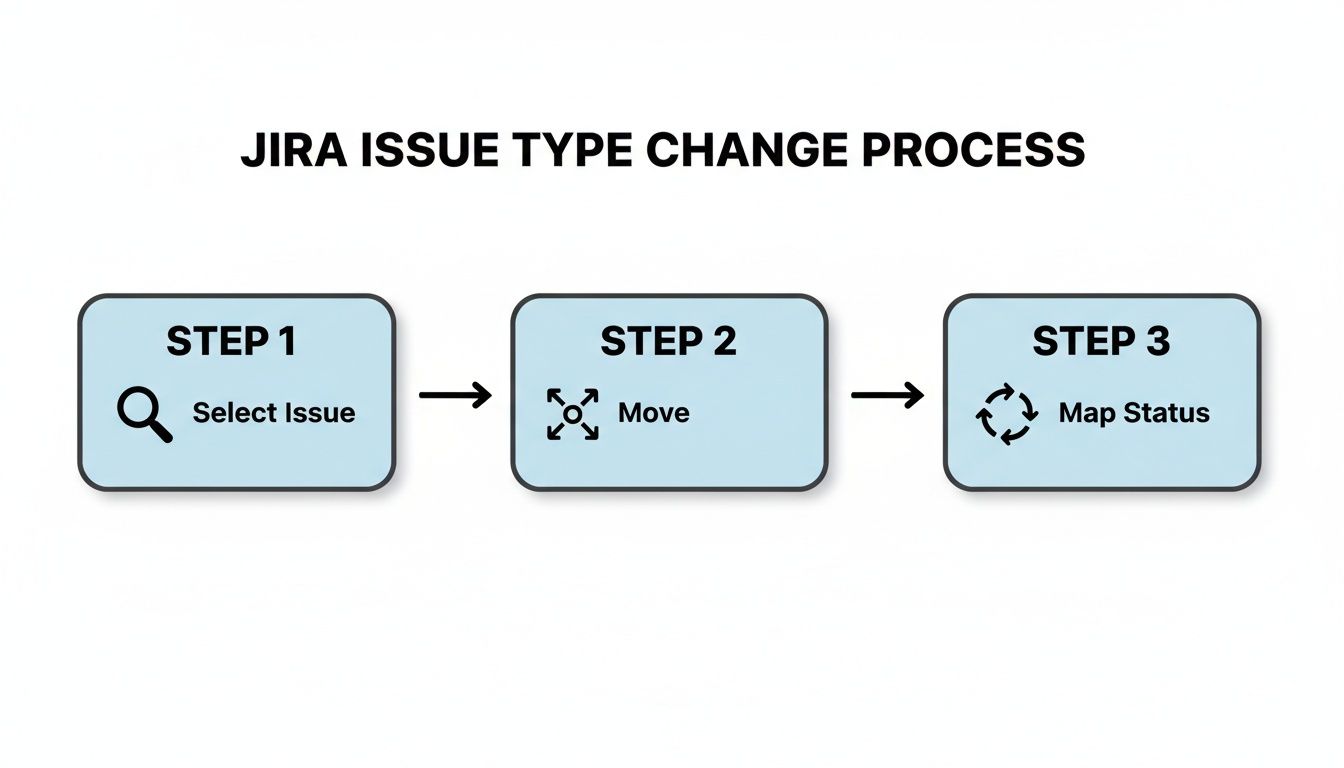
Navigating the Four-Step Change Wizard
After clicking Move, Jira launches a four-step wizard to guide you.
- Choose New Issue Type: The first screen confirms the issue. Select the new
Issue Type. In our example, chooseStory. - Map Status: Now, map the issue's current status to a status in the new workflow. For example, if the
Bugis in "In Triage," map it to the "Backlog" status in theStoryworkflow. This ensures the issue appears where the product owner expects it.- Source Status: The
Bugissue's current status. - Target Status: The status the new
Storywill land in.
Expert Tip: If no status mapping makes sense, cancel the move. Change the original issue’s status to something generic like 'Open' or 'To Do', then restart the move. This prevents the new issue from getting stuck in an illogical state.
- Source Status: The
- Update Fields: This step is crucial for data integrity. Jira lists all fields from the original
Bug. If a custom field like "Root Cause Analysis" doesn't exist on theStoryissue type, Jira will flag it. To preserve this data, copy its contents into a common field like "Description" or add it as a comment before finalizing the move. Otherwise, the data will be permanently discarded. - Confirm Changes: The final step is a confirmation screen summarizing all your changes. Double-check everything. Once you hit confirm, Jira completes the process. DEV-123 is now a
Storyin the development backlog.
Tackling Bulk Issue Type Changes with JQL
To change dozens or hundreds of issues, use Jira's bulk change feature. This tool relies on a precise Jira Query Language (JQL) search to isolate the exact issues you need to modify. A sloppy query can grab the wrong tickets and create a bigger mess. To sharpen your skills, review our guide on how to create a filter in Jira.
Crafting the Perfect JQL Query
Imagine a team has been logging new feature work as Sub-tasks, but they should be Tasks to use a different workflow. A JQL query can quickly gather all relevant issues.
In Jira's advanced search bar, enter this query:
project = "Phoenix Project" AND issuetype = "Sub-task" AND status not in ("Done", "Closed")
This query does three things:
- Limits the search to the "Phoenix Project."
- Targets only issues currently typed as "Sub-task."
- Excludes completed issues to avoid altering project history.
Once the search results show the correct issues, click the ••• menu in the top-right corner and select Bulk change all issues.
The process from here is straightforward but requires care.
As the diagram illustrates, the operation involves selecting the right issues, launching the "Move" action, and carefully mapping statuses and fields to the new issue type.
Navigating the Bulk Change Wizard
After starting the bulk change, Jira presents a wizard similar to the single-issue process. First, check the boxes for the issues you want to modify (usually all of them).
Next, choose the Move Issues operation. Select the target issue type (in this case, Task). Then, you will map statuses and fields.
The number one mistake people make with bulk changes is rushing the mapping screens. One wrong click here can push dozens of issues into the wrong status or, even worse, permanently delete data from custom fields. Slow down and check every single mapping.
For status mapping, you must map every current status from the selected issues to a corresponding status in the new workflow. For example, if sub-tasks are in "To Do" and "In Progress," map them to the equivalent statuses in the Task workflow.
For field mapping, if your Sub-task type has a custom field that the Task type doesn't, Jira will prompt you. In the bulk change wizard, your only choice is to discard the data from that field. If the data is important, cancel the operation, export or copy the data first, and then restart. There is no "undo" button for lost custom field data.
Finally, Jira provides a summary screen. Review it carefully before you commit. After you hit confirm, Jira will process the changes.
Navigating Workflows, Permissions, and Data Integrity
Changing a Jira issue type is a strategic move that involves three core elements: permissions, workflows, and data integrity. Mismanaging any of these can lead to stuck tickets, lost information, or security gaps. To avoid this, you must understand what happens behind the scenes.
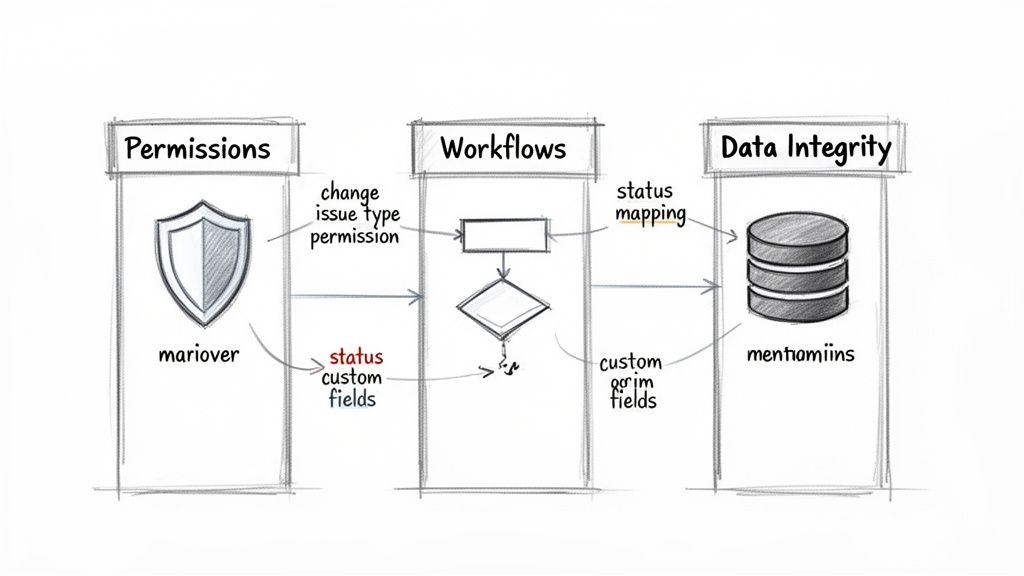
These three elements are interconnected. Permissions determine who can make a change, the workflow defines the path the issue follows, and data integrity ensures nothing critical is lost.
The Gatekeepers: Permissions and Project Roles
If the "Move" option is grayed out, your permissions scheme is working as intended. The ability to Jira change issue type is controlled by the Move Issues and Edit Issues permissions. Admins restrict these permissions for good reason.
An unrestricted "Move" permission is risky. A junior team member could accidentally move a critical Production Bug to a different project as a Marketing Task, causing the ticket to vanish from the engineering backlog and its specific fields to be wiped.
Follow these best practices for assigning permissions:
- Project Admins and Leads: Grant them these permissions to manage the backlog and correct mistakes.
- Scrum Masters and Product Owners: They often need this ability to reclassify work as priorities shift.
- General Users: Restrict this permission for most team members. Have them request changes from a project lead to ensure a second pair of eyes reviews the move.
Untangling Complex Workflow Mapping
Workflow mapping is where most changes go wrong. When you change an issue type, you are often moving the ticket to a completely different workflow. A problem arises when the original issue's status has no logical equivalent in the new workflow.
For example, a Development Task is in "Ready for Deployment." The team changes its type to Release, which has a workflow with "Staging Deploy," "UAT," and "Production Deploy" statuses. There is no direct match for "Ready for Deployment."
If you force a mapping that doesn't make sense, you risk pushing the issue into a state where no one knows what to do next. The best approach is to map to the earliest logical status in the new workflow, like "Staging Deploy," to ensure the process restarts correctly.
Inconsistent workflows can delay projects. Data shows that projects with frequent type changes can see a 25-35% spike in unresolved issues lingering for over 30 days. This happens because re-categorization often resets workflow assignments and disables notifications, leaving the ticket in limbo.
For more details on this topic, see our guide on changing a workflow in Jira.
Preserving Data Integrity During the Switch
You must protect your data during a type change. Each issue type can have its own set of fields controlled by field configurations and screen schemes. When you switch an issue type, any field that exists on the original but not the target is at risk.
For example, a Bug report has a "Log Files" custom field with attached diagnostics. If you change this issue to a Story that doesn't use this field, Jira will ask what to do with that data. Your only option is to discard it. If you proceed, those log files are gone forever.
Use these steps to prevent permanent data loss:
- Audit Before You Act: Before changing the type, review all the source issue's fields. Note any custom fields with essential data.
- Copy and Paste: The simplest manual fix is to copy data from a unique field and paste it into a universal field like "Description" or add it as a comment before starting the move.
- Ask an Admin for Help: If your team frequently moves between two issue types and loses the same data, ask your Jira administrator to add that field to the target issue type's screens. This will streamline future changes.
4. Automating Issue Type Changes for Better Handoffs
Manual issue type changes are fine for occasional fixes, but relying on them for daily process handoffs is inefficient and risky. Each manual change introduces the potential for a forgotten step, a missed notification, or incorrect field mapping.
Automation transforms a basic type change into a smart, reliable, and consistent part of your workflow. Instead of hoping people remember complex procedures, you build the process directly into Jira.
Setting Up Your First Automation Rule
Use Jira’s built-in automation engine, found under Project Settings > Automation. The logic is a simple "when/if/then" model that lets you create rules to react to project events.
Here's how to automate a common service desk scenario:
A customer opens a Service Request for a slow report. A support agent discovers it’s a critical bug and changes the priority to "Highest." This is a perfect trigger for automation. Instead of requiring the agent to also manually change the issue type to Incident, build a rule to do it automatically.
Here’s the rule breakdown:
- Trigger (When):
Issue field value changed. Configure it to monitor the Priority field. - Condition (If):
Issue fields condition. Set it to run only if Priority is nowHighestand the Issue Type isService Request. This prevents the rule from firing on existing Incidents. - Action (Then):
Edit issue. Select the Issue Type field and set it to change toIncident.
Once this rule is active, the moment an agent escalates a Service Request to "Highest" priority, Jira automatically converts it to an Incident. No extra clicks or forgotten steps.
Expanding Automation for Cross-Team Handoffs
This simple type change can trigger a more sophisticated handoff. Add more actions to the same automation rule to orchestrate the entire response:
- Re-assign issue: Automatically assign the new
Incidentto the on-call Site Reliability Engineering (SRE) team. - Add comment: Post a standardized comment, such as "This issue has been automatically converted to an Incident due to its 'Highest' priority," to keep everyone informed.
- Send notification: Send a message to the
#sre-incidentsSlack or Microsoft Teams channel to alert the right people immediately.
This approach shifts your process from reactive and manual to proactive and automated. The system handles administrative work, freeing up your team to solve the problem.
To learn more about how different issue types are routed, explore the principles of automated ticket routing. This practice ensures that once an issue is reclassified, it immediately enters the correct operational stream.
For more advanced, multi-step workflows, our guide to Jira workflow automation offers deeper insights.
Automating the jira change issue type command isn't just about saving clicks. It’s about building a more resilient system where process rules are enforced, handoffs are frictionless, and your team can work with confidence.
Dealing With Common Errors When Changing Issue Types
Even with a solid plan, changing an issue type in Jira can cause errors. Most error messages point to simple configuration mismatches that you can often fix without waiting for a Jira admin.
Here are the most common roadblocks and how to resolve them.
Why Is the "Move" Option Grayed Out?
This is the most common issue. If you open an issue's actions menu (•••) and the "Move" option is grayed out, it is 100% a permissions issue.
Your user account lacks the Move Issues permission in the project's configuration. There is no workaround. Contact your project administrator or a Jira admin, explain what you are trying to do, and request the necessary access.
My Fields Vanished After the Change!
If key information like "Story Points" or an "Epic Link" disappears after changing the issue type, don't panic. The data is hidden, not deleted.
This occurs because the issue's Screen Scheme controls which fields are displayed. If the new issue type is not configured to show a certain field, Jira will hide it, but the data remains in the background.
What to do: First, check the issue's history tab to confirm the data is still logged. Once you've confirmed it's there, ping your Jira admin. Tell them exactly which field is missing on the new issue type, and they can tweak the project's Screen Scheme to make it visible again.
The Issue Is Stuck in a Status and Won't Budge
This tricky problem can bring an issue to a complete stop. You change the issue type and map the status correctly, but later find you can't transition the issue forward because the buttons are missing or disabled.
This is a classic workflow mapping problem. The status you moved the issue into is a dead end in the new workflow, with no configured outgoing transitions. For example, if you move a Bug from "Closed" to a Task's "Done" status, and the Task workflow prohibits transitions out of "Done," your issue is stuck.
Here’s how to get it unstuck:
- Check the Workflow: Ask your admin to show you the workflow diagram for the new issue type. They can immediately see if the current status has any outgoing transitions.
- Move It Again: The fastest fix is often to "reset" the issue's place in the workflow. Perform another type change to a temporary type (like
Sub-task), mapping its status to an early state like "To Do." Then, immediately move it back to the correct issue type, again mapping it to an early status. This gives it a fresh start in the correct workflow.
Common Questions and Quick Answers
When changing issue types in Jira, a few questions consistently arise. Here are the answers to the most common ones.
Can I Undo a Change to an Issue Type?
Yes, you can change an issue type back by repeating the "Move" process. If you accidentally moved a Bug to a Story, simply move it back to Bug.
However, be aware of potential data loss. If the original move caused data from a custom field to be discarded (because the field didn't exist on the new issue type), that data is gone permanently. Moving the issue back to its original type will not restore it.
What Happens to Sub-Tasks When I Change the Parent Issue’s Type?
Sub-tasks will remain linked to the parent issue after you change its type, and they will keep their original issue type. The risk is whether the new parent issue type is configured to support sub-tasks.
For example, if you change a Task with three sub-tasks into an Epic, there is no problem, as Epics are designed to contain other issues. But if you move that same Task to a custom issue type that is not configured to allow sub-tasks, those sub-tasks will be orphaned. They will lose their parent-child link, disrupting dependency tracking.
Always double-check that the destination issue type supports the same hierarchy. Breaking that parent link can throw a major wrench in your team's ability to track work from start to finish.
Why Is the Issue Type I Need Missing from the List?
If the issue type you want isn't in the dropdown list during the "Move" process, it's almost always a project configuration problem. There are two primary causes:
- It’s Not in the Project's Issue Type Scheme: Every Jira project has an Issue Type Scheme that defines which issue types are available. If the type you need isn't included, a Jira admin must add it to that project's scheme.
- Workflow or Field Mapping Conflicts: In rare cases, Jira might block the move due to a significant conflict between the old and new workflows or field configurations. If the wizard cannot map the data cleanly, it will not allow you to proceed. This indicates a deeper configuration issue that an admin needs to resolve.
Ready to eliminate manual handoffs and enforce your team's processes directly within Jira? Harmonize Pro builds powerful apps that turn static tickets into dynamic workflows. With our app Nesty, you can create automated checklists and quality gates that ensure every step is completed correctly, every time. Learn how to build smarter, more reliable workflows.
Leave a Reply