To master release management in Jira, you need to think beyond tracking tasks. The goal is to transform Jira into a command center for your entire deployment pipeline, creating a single source of truth that governs planning, execution, and monitoring.
This guide will show you how to move past Jira’s native 'versions' feature and build a repeatable framework that reflects how your team actually delivers software.
Moving Beyond Basic Jira Release Tracking
Jira is excellent for managing individual issues. But for orchestrating a full software release, its out-of-the-box features can be limiting.
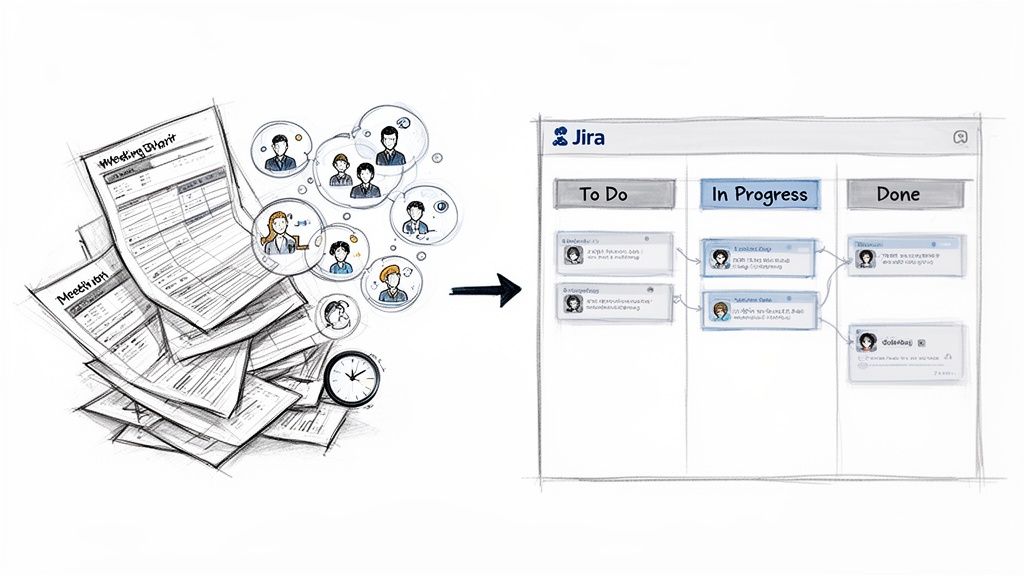
Too many teams juggle spreadsheets, chase manual updates in Slack, and sit through marathon status meetings just to understand a release's status. This scattered approach leads to missed deadlines, miscommunications, and last-minute scrambles.
This guide provides an actionable blueprint to cut through that chaos. We will walk through how to build a structured, centralized system using a single, dynamic Jira ticket as the command center for an entire release. This approach gives everyone one clear place to look from planning all the way through to production.
The Problem with Native Jira Versioning
Relying solely on Jira’s native features for large-scale releases often leads to major delays. Teams who stick to the built-in versioning can see their release dates slip in up to 70% of their cycles. Why? Because scope is often just a manual count of issues, completely ignoring cross-project dependencies and the varying complexity of the work.
This limited view can inflate coordination overhead by 40-50% as release managers are forced to hunt down updates project by project. As IKU Team’s detailed release management analysis points out, this operational drag is precisely why a more structured approach is so critical.
Actionable Insight: Treat your release as more than a collection of 'done' tickets. It's a carefully coordinated sequence of deployments, quality checks, and approvals. The first step toward a predictable pipeline is to model this sequence directly inside a single Jira ticket.
Why a Centralized Release Ticket Works
Shifting your process to revolve around a single "release ticket" immediately solves the problems that basic version tracking creates.
Here’s the actionable value you gain:
- A True Single Source of Truth: All critical information—checklists, dependencies, approvals, deployment logs—lives in one place. Stop digging through different projects or Confluence spaces.
- Clear Visibility for Everyone: Any stakeholder, from an engineer to an executive, can open one ticket and instantly understand the release status, see what's blocking progress, and know what’s coming next.
- Built-in Process Compliance: By building your workflow directly into the ticket with checklists and automated gates, you ensure steps aren't skipped. The process itself becomes the guide.
- Effortless Auditability: The ticket's history automatically becomes a complete, time-stamped log of the entire release, making post-mortems and compliance reviews simple.
For a deeper look at the foundational concepts behind this, you can explore resources on comprehensive release management. This strategy isn't about replacing Jira, but about elevating it to handle the multi-stage reality of modern software delivery.
Designing Your Repeatable Release Workflow in Jira
A solid release process isn’t about more meetings or more spreadsheets. It’s about building a clear, repeatable workflow that everyone understands and follows, right inside the tools you already use every day. The goal is to replace chaotic, last-minute scrambles with a predictable system within Jira.
The most effective way to achieve this is to map your entire deployment pipeline—from code commit to production push—inside a single, centralized Jira ticket. This ticket evolves from a simple tracker into a living, self-managing vehicle for the entire release.
You’ve probably seen the progression yourself. Teams start with scattered spreadsheets and endless status meetings, eventually realizing they need a single source of truth. That’s where the central ticket comes in.
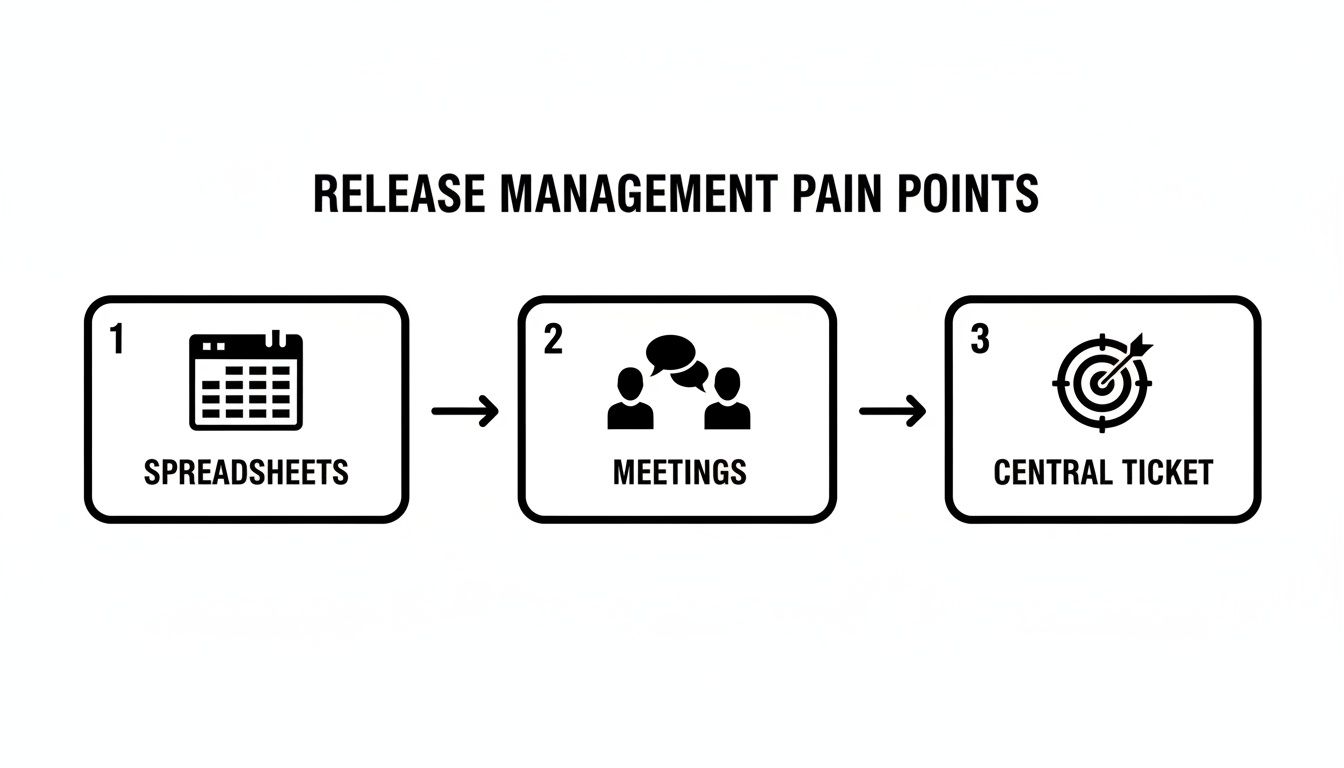
This journey from manual chaos to streamlined control is where the magic happens. A single, well-structured ticket replaces all those fragmented communication channels and becomes the undisputed hub for everything related to the release.
Structuring Your Release with Phases
First, break down your release into logical, sequential phases. Instead of a giant, overwhelming task list, create distinct stages that mirror your actual deployment environments. This structure brings immediate clarity, letting anyone see exactly where things stand at a glance.
For a typical multi-environment deployment, structure the phases as main checklist items in your central Jira ticket:
- Phase 1: Pre-Deployment Readiness
- Phase 2: Dev Environment Deployment
- Phase 3: QA Environment Testing
- Phase 4: Staging Environment Validation
- Phase 5: Production Rollout & Post-Launch Monitoring
This phased approach does more than just organize tasks; it turns a static ticket into an active command center. Everyone involved knows their responsibilities and, just as importantly, how their work connects to the bigger picture.
Using Nested Checklists for Granular Tasks
Each high-level phase consists of many smaller, specific actions. This is where nested checklists become your most practical tool. They let you add granular detail under each phase without cluttering the main ticket.
Let’s take Phase 3: QA Environment Testing as an example. The nested checklist should look like this:
- Run Automated Regression Suite
- Confirm all smoke tests passed.
- Attach test execution report.
- Perform Manual Exploratory Testing
- Test new features against acceptance criteria.
- Log any new bugs and link them here.
- Conduct Performance and Load Testing
- Verify response times are within SLAs.
- Document performance benchmarks.
- Obtain QA Sign-off
- Get formal approval from the QA Lead.
With this layered structure, every detail is captured and tracked. Nothing falls through the cracks, and the process is documented automatically as the team checks off items.
Actionable Insight: Transform your process from a document people might read into a workflow they must follow. The ticket itself enforces the sequence of operations.
Enforcing Definitions and Quality Gates
A well-designed workflow doesn't just suggest a process—it enforces your standards. For every phase, build in your Definition of Ready (what you need to start the phase) and your Definition of Done (what you need to complete it).
This becomes incredibly powerful when you use apps like Nesty to create blockers between tasks. For example, you can physically prevent the "Obtain QA Sign-off" task from being checked off until "Attach test execution report" is complete. These proactive quality gates are game-changers, stopping premature handoffs and ensuring quality is baked in at every step.
To see the difference, let's compare the old way with this structured, automated approach.
Manual vs Automated Jira Release Workflow
This table breaks down the common frustrations of a manual release process against the actionable solutions a checklist-driven workflow provides.
| Phase | Manual Process (Common Pain Points) | Automated Workflow (Solution) |
|---|---|---|
| Release Planning | Handoffs are missed due to manual notifications in email or chat. Tasks fall through the cracks. | Handoffs and stakeholder notifications are fully automated, triggered by checklist completion. |
| Execution | The Definition of Ready/Done lives in a separate Confluence page that no one reads. | The DoR/DoD is built directly into the ticket as a required checklist. Nothing moves forward until it's done. |
| Quality Gates | Quality checks are reliant on manual verification, leading to human error and skipped steps. | Key steps are blocked until dependencies (e.g., test reports) are completed and attached. |
| Visibility | It’s impossible to know the true status without attending a sync meeting or chasing people down. | A single Jira ticket provides a real-time, at-a-glance view of the entire release progress. |
| Compliance & Audits | Proving process adherence is a painful, manual effort of digging through tickets and chat logs. | The completed checklist serves as an automatic, immutable audit trail of the entire release. |
By moving to an automated workflow, you're not just making the process faster; you're making it more reliable, transparent, and auditable.
Recent trends in Jira’s evolution highlight this shift toward app-powered scalability and process enforcement. While native Jira is great for tracking scope, its lack of cross-project visibility means 65% of teams are still manually checking progress across different projects. This is exactly where modern apps come in. Tools like Nesty use unlimited nested checklists to enforce these multi-environment gates, helping teams I’ve worked with achieve 95% audit compliance and 30% faster handoffs compared to a standard Jira setup.
You can see how these advancements are reshaping release management by exploring these key insights on Jira's evolution. By building a structured, repeatable workflow, you’re transforming release management with Jira from a reactive tracking exercise into a proactive, predictable delivery engine.
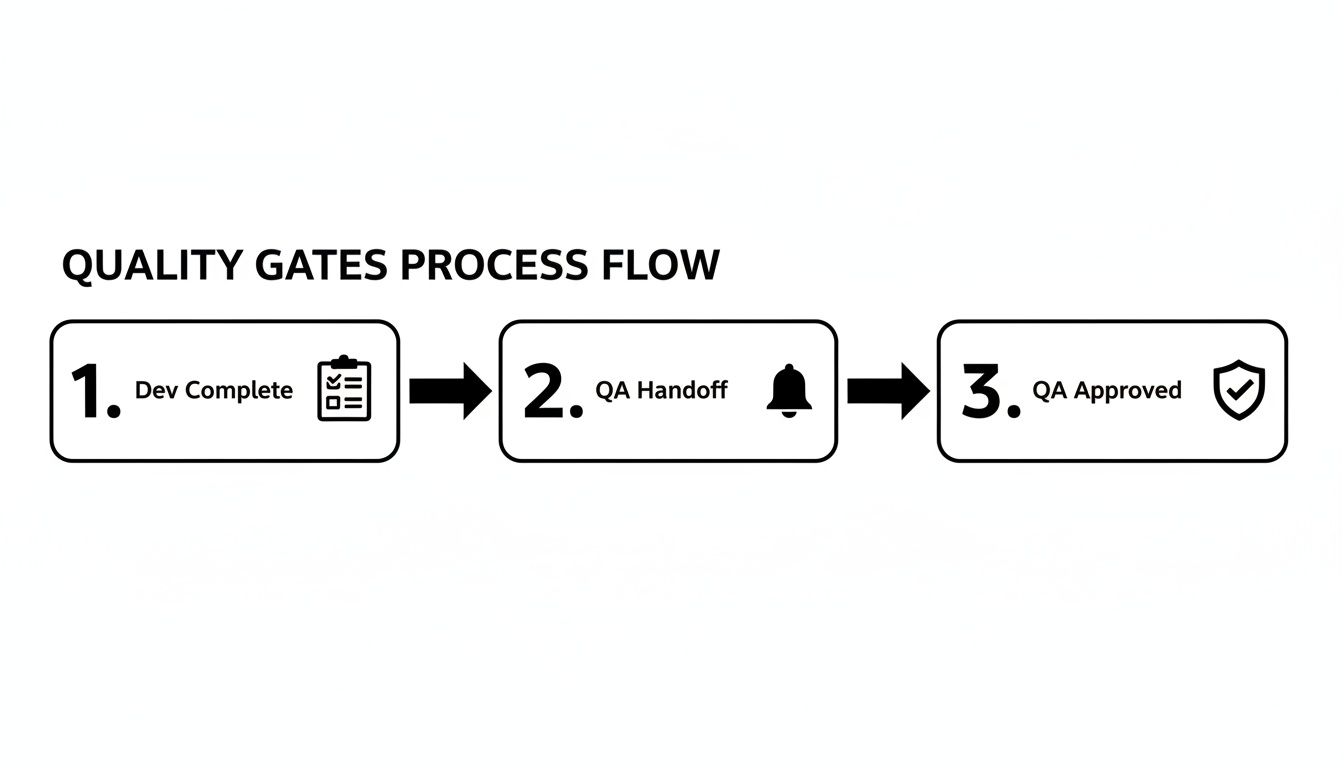
Building Automated Quality Gates and Handoffs
Manual handoffs are where release plans crack. A developer marks a task 'done,' but the notification gets buried in a noisy Slack channel, or the QA team never gets the memo. This communication friction causes delays, forcing leads to waste time chasing updates.
This is where intelligent, automated handoffs and quality gates built right into your Jira workflow completely change the game. By setting up smart triggers, you can enforce your Definition of Ready and Definition of Done automatically. The system becomes the enforcer, creating a self-policing process that keeps your release on track.
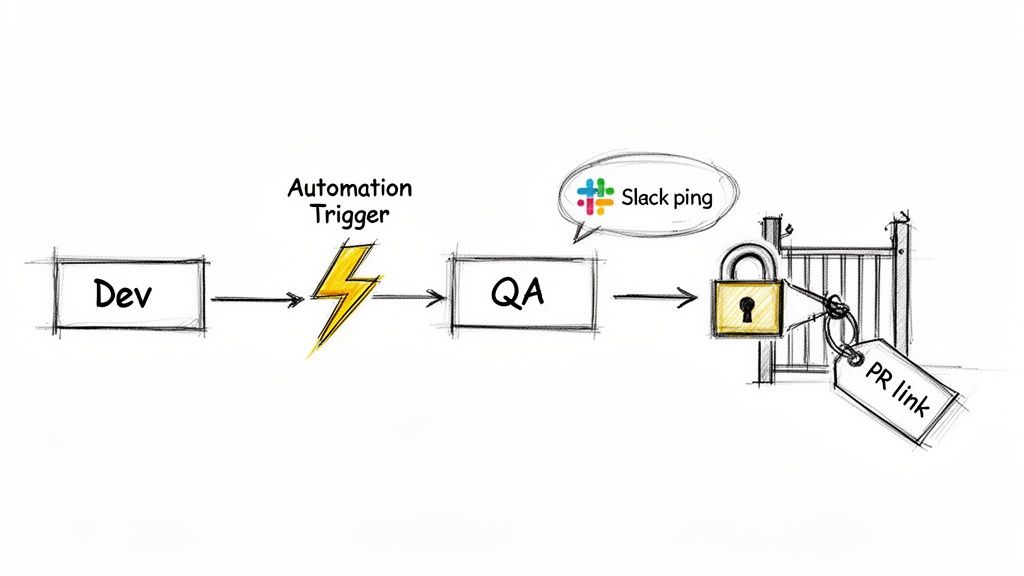
Automating the Handoff From Development to QA
Let’s focus on the critical handoff from development to quality assurance. In a manual world, this step is a mess of comments and DMs. We can eliminate that ambiguity.
Here's how to automate it: when a developer completes their 'Dev' checklist, a Nesty automation rule can trigger a chain reaction:
- Reassign the Ticket: The Jira issue is instantly assigned to the correct QA lead or a shared QA user group. No more "Who's picking this up?"
- Send a Targeted Notification: A message is sent to a specific Slack or Microsoft Teams channel (like
#qa-team-alerts), tagging the new assignee with a direct link to the ticket. - Unlock the Next Phase: The 'QA Testing' checklist, previously locked and hidden, becomes visible and active for the QA team.
This automated sequence creates a clean, immediate handoff. There's no guesswork or lag time. The process moves forward the moment prerequisite work is done.
Enforcing Quality Gates With Blockers
Automated handoffs become truly powerful when paired with quality gates—mandatory checkpoints that stop a task from moving forward until specific criteria are met. This is how you bake quality directly into your release management with Jira.
For instance, configure a blocker that prevents the 'Dev Deployment' checklist from being completed until a pull request link is added to a custom field on the Jira ticket. If a developer tries to check the final box without the PR link, a message pops up telling them exactly what’s missing.
Actionable Insight: Design your workflow to make it impossible to do things the wrong way. By automating quality gates, you shift the responsibility for process compliance from people to the system itself.
This approach is perfect for enforcing prerequisites. You can block a handoff to QA until unit test results are attached, or prevent a staging deployment until security scan reports are uploaded, eliminating manual verification. To dial in the testing side of this, check out these strategies for managing test cases in Jira, which fit perfectly with these automated gates.
The impact is huge. Swiss Re, coordinating releases for 12 interconnected applications, saw communication overhead consume over 50% of the release team’s time. By automating handoffs in Jira, they cut that overhead in half and saw 30% faster cycle times. You can get more details on how Jira transformed their release process.
Real-World Examples of Automated Gates
Here are practical quality gates you can build to bulletproof your release workflows:
- Peer Review Approval: Block a ticket from moving to 'Ready for QA' until a 'Code Review' sub-task is marked 'Approved' by at least one other developer.
- Documentation Check: Lock the 'Ready for Staging' phase until a link to the updated Confluence documentation is added to the main release ticket.
- Product Owner Sign-off: Keep the final production deployment checklist locked until the Product Owner clicks a custom 'Approve for Release' button inside the Jira issue.
By setting up these automated gates and handoffs, you’re not just tracking work—you’re building a robust, self-documenting, and compliant workflow. Your Jira ticket becomes the central orchestrator for your entire release, guaranteeing quality and consistency.
Practical Automation Recipes for Your Release Process
Theory is one thing; practical, reusable templates are another. Let's dig into concrete "recipes" you can implement directly in your Jira release process.
Think of these as actionable blueprints for building a more reliable and speedy delivery pipeline.
Recipe 1: The Multi-Environment Deployment
This is the classic workflow for most software teams. This recipe ensures that progression through dev, staging, and production is smooth and compliant.
Here’s how to structure this inside a release ticket:
-
Phase 1: Development Deployment
- Deploy the build to the development server.
- Run initial smoke tests.
- Gate: Block completion until the build number is entered in a custom field.
-
Phase 2: Staging Deployment & QA
- Deploy the build to the staging server.
- Execute the full regression test suite.
- Conduct user acceptance testing (UAT).
- Gate: Block completion until the UAT sign-off document is attached.
-
Phase 3: Production Rollout
- Schedule the production deployment window.
- Execute pre-flight checks.
- Deploy to production.
- Gate: Block completion until post-deployment monitoring is confirmed stable.
The automation between phases is key. With an app like Nesty, completing the "Development Deployment" checklist can instantly reassign the ticket to the QA team, ping them in Slack, and unlock the "Staging Deployment & QA" checklist. This creates a seamless, auditable flow.
Recipe 2: The Streamlined Hotfix Release
When a critical bug appears in production, speed is essential. A hotfix process can't afford the lengthy checks of a standard release. This recipe provides an accelerated workflow for urgent patches.
The key is a condensed process that prioritizes rapid validation and deployment while maintaining essential safeguards.
-
Step 1: Identify & Verify
- Link the original production bug ticket.
- Confirm you can reproduce the bug.
- Get emergency approval from the Product Owner.
-
Step 2: Develop & Test
- Create a dedicated hotfix branch.
- Write a targeted regression test for this specific bug.
- Gate: Block deployment until a senior developer approves the pull request.
-
Step 3: Deploy & Monitor
- Deploy the fix directly to production.
- Monitor system health and logs for 15 minutes.
- Communicate the fix to stakeholders and support teams.
A great hotfix process is a completely different workflow designed for a specific, high-stakes scenario. To make this work, lean on established CI/CD best practices. For a deeper dive, the guide on the Top 10 CI CD Pipeline Best Practices for 2025 is an excellent resource.
Actionable Insight: Having a hotfix workflow pre-built in Jira turns a potential crisis into a calm, controlled procedure. No more panic, just execution.
Automation at a Glance
So, how do all these handoffs and gates actually work? Here are the most common and powerful automation triggers you can set up to make your release workflows self-managing.
| Automation Goal | Trigger Condition (When This Happens…) | Automated Action (…Do This) |
|---|---|---|
| Handoff to QA | All development tasks in a phase are complete. | Reassign the release ticket to the QA lead and post a message in the #qa-team Slack channel. |
| Enforce UAT Sign-off | The "Deploy to Staging" checklist is complete. | Transition the ticket to "Awaiting UAT" and lock the "Deploy to Production" checklist until a sign-off doc is attached. |
| Notify Stakeholders | The release ticket is transitioned to "Deployed." | Send an automated email and a Teams message to the product and marketing teams announcing the new release. |
| Create Post-Release Task | The "Deploy to Production" checklist is complete. | Automatically create a sub-task assigned to DevOps titled "Monitor Production Health for 1 Hour." |
| Verify DoD | A user tries to transition the ticket to "Done." | A validation rule checks if all required fields (like build number and test results) are filled. If not, the transition is blocked. |
This table shows how simple "if-then" logic can eliminate missed steps, delays, and human error from your release cycle.
Recipe 3: The Feature Flag Rollout
Modern releases often use feature flags for phased rollouts, de-risking deployment by enabling functionality for a small slice of users first. Managing this in Jira requires a different kind of checklist.
This recipe tracks the gradual exposure of a feature over time.
Feature Rollout Plan
| Phase | Key Tasks | Target Audience |
|---|---|---|
| Internal Testing | Enable flag for the internal QA team and all company employees. | 0% of Customers |
| Beta Group | Enable flag for a select group of beta testers. Monitor feedback channels. | 5% of Customers |
| Gradual Rollout | Increase exposure to 25%, then 50% of the user base. Monitor performance metrics. | 25%-50% of Customers |
| Full Release | Enable flag for all users. Plan for the removal of the old code path. | 100% of Customers |
Each phase becomes its own checklist within the main Jira ticket. When the "Beta Group" phase is marked complete, an automation can create a follow-up task for the DevOps team to bump the feature flag to 25%. This keeps Jira perfectly synced with technical reality.
These recipes are a starting point. The real power comes from adapting them to your team's specific needs. To learn more about building these kinds of intelligent workflows, explore advanced techniques for Jira workflow automation. This is how you turn Jira from a passive tracking system into an active, automated engine for delivery.
Keeping an Eye on Release Health in Real-Time
Automating handoffs and building quality gates is a huge step forward, but the next step is to use data to improve your process. You need clear, real-time visibility into release health—without spending hours manually compiling reports.
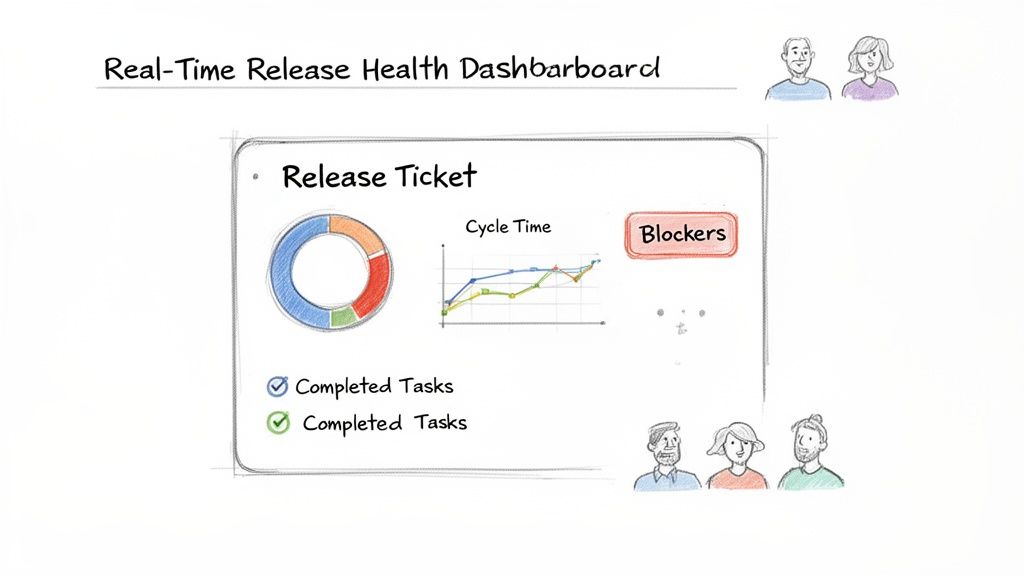
This is where your centralized release ticket becomes the star. By running everything through a single, well-structured Jira issue, you create a command center perfect for both execution and analysis.
The Release Ticket as Your Single Source of Truth
Once your workflow is running, the central ticket becomes a living dashboard. Anyone—from a product manager to an executive—can look at that one ticket and instantly get what they need:
- Overall Progress: Which stage are we in? What percentage is done?
- Active Blockers: Is anything stuck? Who owns the blocker?
- Completed Milestones: What’s been finished and who signed off?
- What's Next: What’s in the queue for each team?
This transparency makes most status update meetings obsolete. The ticket is the update, available 24/7.
Using Data to Proactively Improve
A single source of truth isn't just for daily tracking; it’s for collecting data to improve the process. Every checklist item, handoff, and approval is timestamped and tracked in Jira. You are automatically collecting a goldmine of performance metrics.
This structured data is exactly what Jira Dashboards were made for. You can set up gadgets to track key metrics across all releases, helping you shift from reacting to fires to proactively optimizing your flow.
Actionable Insight: When your process lives inside Jira, your metrics are generated automatically. You stop guessing where your bottlenecks are and start seeing them clearly in the data.
Key Metrics for Your Release Dashboard
Start with a few metrics that give you a clear, high-level picture of your release pipeline’s health.
Here are the essentials to track:
- Cycle Time per Phase: How long does QA testing or staging validation take on average? A rising number is a red flag that a stage needs investigation.
- Blocker Frequency: Which quality gates are triggered most often? If the "PR link missing" blocker appears constantly, it's a sign you need a pre-commit checklist or better team communication.
- Handoff Lag Time: What’s the average delay between one phase ending and the next one starting? A long pause between ‘Dev Complete’ and ‘QA Started’ may point to a resource crunch.
- Release Success Rate: What percentage of releases go live without needing a hotfix or rollback within 24 hours? This is the ultimate test of your process's quality.
Monitoring these trends helps you spot recurring problems and fix the root cause. Visualizing this data makes patterns impossible to miss. To turn this raw data into actionable insights, learn how to create a report in Jira. This is how you close the loop, using visibility to drive continuous improvement.
Common Questions About Managing Releases in Jira
As you formalize your release process in Jira, you'll encounter a few tricky situations. Here’s how to handle common hurdles.
How Can I Manage Cross-Project Dependencies in Jira?
Dependencies are a major headache in release management. While Jira's native issue linking is available, it's static. You get a list of links with no real-time status, forcing release managers to chase updates.
A better approach is to make your centralized release ticket the single source of truth. Create a dedicated checklist inside that ticket called "Cross-Project Dependencies" and link to the specific issues your release is waiting on.
Actionable Insight: Pull dependency tracking directly into your main release ticket to turn a passive list into an active, automated quality gate. The release cannot move forward until every dependency is resolved.
Using an app like Nesty, you can take this further. Set up automation that actively monitors the status of those linked issues. For example, create a blocker that prevents the 'Deployment to Staging' checklist from starting until every linked dependency ticket is marked 'Done.' This centralizes tracking and makes dependency management a proactive, hands-off part of your workflow.
What's the Best Way to Handle Rollbacks?
A good release plan must cover what to do when things go wrong. The key to handling rollbacks is to plan for them before you need one. Have a calm, procedural response ready instead of a last-minute scramble.
Inside your main release ticket, include a dedicated—but initially dormant—checklist for your "Rollback Procedure." This should outline every step required to safely revert the deployment, from database restores to flipping feature flags off.
You can use automation to keep this section locked until a failure is detected. For instance, if a "Production Validation" task fails, a trigger can automatically:
- Unlock and assign the "Rollback Procedure" checklist to the DevOps team.
- Send an urgent notification to key stakeholders in a dedicated Slack or Teams channel.
- Change the main ticket's status to "Rollback in Progress" for full visibility.
This provides a rapid, consistent, and documented response to failures, drastically reducing downtime and stress.
Can This Jira Process Integrate With CI/CD Tools?
Absolutely. A tight integration between your Jira workflow and your CI/CD pipeline is where the magic happens. The Jira release ticket manages the process—quality gates, handoffs, and approvals—while your CI/CD tool (like Jenkins, GitLab CI, or CircleCI) handles the technical execution of builds and deployments.
The connection is typically handled through webhooks or API calls, creating a powerful two-way conversation.
Here’s a common integration flow:
- Jira to CI/CD: When the "Deploy to Staging" task is approved in your Jira ticket, an automation sends a webhook to your CI/CD tool.
- CI/CD Executes: The webhook triggers the corresponding deployment job in Jenkins, which builds and ships the code to staging.
- CI/CD to Jira: Once Jenkins reports a successful deployment, it calls Jira's API to automatically check off the "Deployment Successful" task in your checklist.
That final step in Jira can then trigger the next phase, like notifying the QA team that the new build is ready. This creates an automated loop between process management in Jira and technical execution in your CI/CD platform.
Ready to stop chasing manual updates and build a predictable, automated release pipeline? Harmonize Pro's flagship app, Nesty, transforms Jira into a true command center for your releases. With unlimited nested checklists, intelligent triggers, and powerful quality gates, you can build the self-managing workflows described in this guide. Try Nesty today and bring clarity and control to your release management with Jira.