
Creating a filter in Jira is often one of the first "aha!" moments for new users. It's the point where you go from just tracking tasks to actively managing your workflow. Thankfully, you don't need to be a query wizard to get started.
Create Your First Jira Filter in Minutes
The quickest way to get started is with Jira's Basic Search. Think of it as a set of simple, dropdown-driven controls that let you instantly slice and dice your issues without writing a single line of code. It’s intuitive, powerful, and the perfect entry point.
This isn't just a niche feature; it's fundamental to how experienced teams use Jira. According to 2025 statistics from Atlassian's community forums, over 85% of Atlassian Cloud users create at least one custom filter in their first month. It’s a clear indicator of how essential this skill is for getting real value out of the platform.
Getting Started with Basic Search
Let’s build a filter for a common scenario: you need a clean view of all open tasks currently assigned to you in a specific project.
Here are the exact steps to build that view:
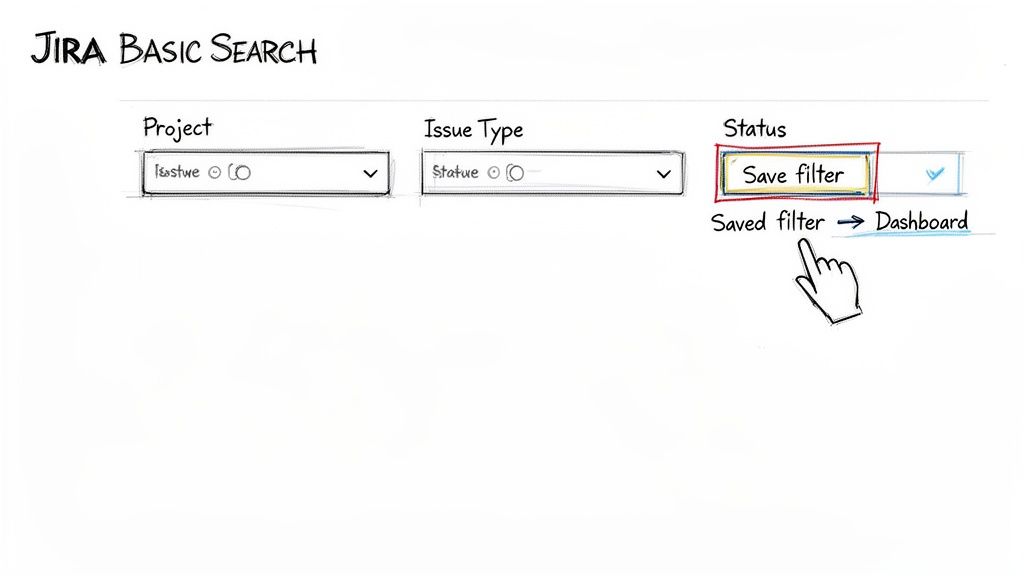
- First, navigate to Filters in the top navigation bar and select View all issues.
- Ensure you are in "Basic" search mode. If the interface shows "JQL," click the link to switch it back.
- Now, use the dropdown menus to define your search:
- Project: Set this to your current project (e.g., "Apollo Project").
- Assignee: Choose "Current User." This makes the filter dynamic—it will always show tasks assigned to whoever is viewing it.
- Status: Select both "To Do" and "In Progress."
The issue list below updates instantly as you select these options. To save this view, click the Save as button at the top. Give it a clear name like "My Open Apollo Tasks." This makes it easy to find and reuse later.
Why Your First Filter Matters
That simple search you just saved is far more than a bookmark. It’s a reusable building block that transforms Jira into a personalized, high-signal workspace.
Key Takeaway: A saved filter isn't just a search; it's a dynamic, reusable view of your work that can power dashboards, boards, and automated reports.
For instance, you can immediately use the "My Open Apollo Tasks" filter to:
- Power a gadget on your personal dashboard for an at-a-glance view of your workload.
- Define quick filters on a Kanban board to easily toggle this view on and off.
- Set up a daily email subscription that sends you a summary of your tasks.
Mastering Basic Search is your first step toward making Jira work for you, turning it from a simple data repository into an active project management partner.
Jira Basic Search vs JQL Search at a Glance
As you get more comfortable, you'll need to decide when to use Basic Search versus its more powerful sibling, JQL. The choice depends entirely on the complexity of your question.
This table gives you an actionable breakdown:
| Feature | Basic Search | JQL (Jira Query Language) |
|---|---|---|
| Use Case | Ideal for quick, straightforward searches based on common fields like project, status, and assignee. | Necessary for complex, multi-layered queries involving date ranges, issue history, or custom fields. |
| Complexity | Beginner-friendly, with no coding required. Uses intuitive dropdown menus and text boxes. | Requires learning a specific syntax of fields, operators, and values. Has a steeper learning curve. |
| Capabilities | Limited to the fields and options presented in the UI. Cannot perform historical or relative date searches. | Offers complete control, allowing you to search for virtually any data point within Jira. |
For most day-to-day needs, Basic Search is more than enough. But when you need to ask very specific questions—like "show me all bugs created in the last 7 days that haven't been updated"—JQL is the tool you'll need.
Unlocking Advanced Control with JQL
While Basic Search is great for getting started, you'll eventually need to ask questions that are too complex for a dropdown menu. That’s your cue to dive into Jira Query Language (JQL). Think of it as switching from a point-and-shoot camera to a DSLR—you gain full control to frame the exact shot you need.
With JQL, you move from picking options to writing precise commands. This lets you build a filter for literally any scenario you can dream up.
Its role in modern project management is huge. Projections show that by 2026, Jira filters will be the backbone of 70% of all dashboards in active production environments. We're also seeing filter creation skyrocket, expected to hit 2.5 million new filters each year across Atlassian's global base of over 250,000 organizations. If you're interested in the data behind these trends, you can discover more insights about Jira usage at scale in this deep-dive presentation.
Understanding the JQL Building Blocks
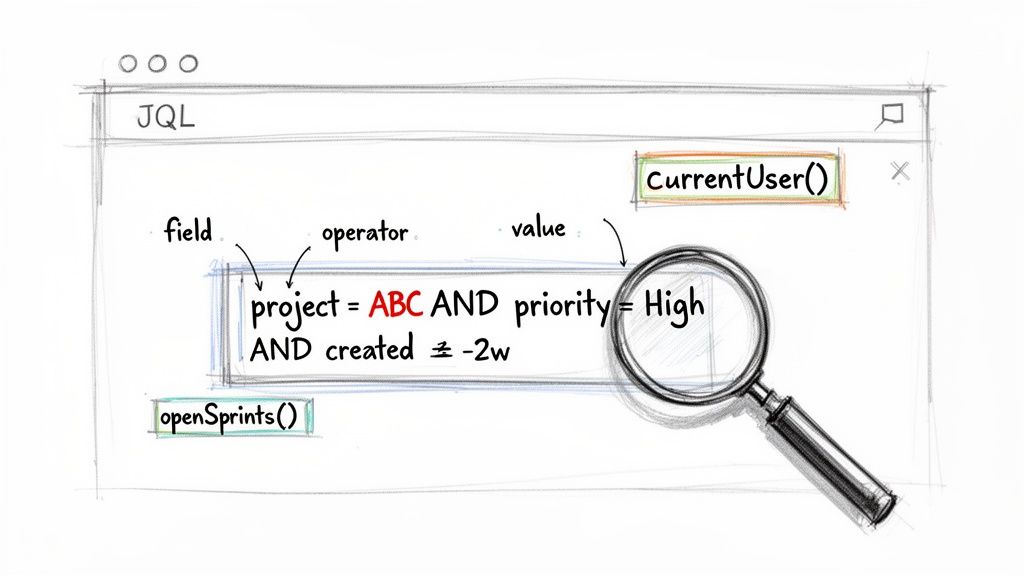
Every JQL query, no matter how complex, is made of just three parts. Master these, and writing your own queries will become second nature.
- Fields: These are the data points on a Jira issue—think
assignee,status,project, orpriority. Don't forget this includes any custom fields your Jira admin has set up! - Operators: These are the connecting words of your query, like
=(equals),!=(does not equal),IN(matches one of many), and<(less than). - Values: This is the specific data you're looking for. It could be a username, a status like "In Review," a project key ("AP"), or a date.
Putting it all together is simple. The basic search we created earlier would look like this in JQL: project = "Apollo Project" AND status = "To Do". It's a logical sentence that Jira can understand.
Creating Practical JQL Filters
The real power of JQL comes alive when you build queries that the basic search just can't handle. Let's walk through a couple of real-world examples that solve common headaches.
Example 1: Find High-Priority Bugs Created Recently
As a QA lead, you need a list of all critical bugs logged in the last two weeks for a specific project. Use this JQL:
project = "Apollo Project" AND issuetype = Bug AND priority = Highest AND created >= -14d
This query instantly pulls a targeted list of the most urgent issues needing attention. The created >= -14d part uses a relative date, something the basic search simply can’t do.
Example 2: Identify Blocked Tasks for Your Team
As a team lead, you need to know what's stuck. This JQL query will show you every task assigned to your team that’s currently marked as "Blocked."
assignee IN membersOf("apollo-dev-team") AND status = "Blocked"
The key here is the membersOf() function. Instead of manually listing every person on your team, you can reference the Jira group. This is more efficient and automatically stays up-to-date as the team changes.
Pro Tip: Use dynamic functions like
currentUser()andopenSprints()to build powerful, reusable filters. A query likeassignee = currentUser() AND sprint IN openSprints()is invaluable—it shows whoever is viewing it their own work in any currently active sprint.
By mastering these simple JQL structures, you'll go from just finding information to extracting real, actionable intelligence from your Jira projects.
Managing and Sharing Your Jira Filters
So, you’ve built the perfect JQL query. That's a great start, but it’s only half the job. A filter’s real power isn’t just in finding issues—it’s in making that information easy to find, understand, and act on for both you and your team.
If you don't manage them properly, your Jira instance can quickly turn into a digital junkyard of confusing, outdated, or duplicate filters. It creates more noise than signal. This is exactly why getting your saving and sharing habits right from the beginning is so important. A well-named, correctly permissioned filter goes from being a personal search to a valuable team asset.
Think about the difference between a private filter like ‘My Overdue Tasks’ and a shared one like ‘Team’s Current Sprint Backlog.’ One is for your own accountability, while the other gives the entire team the visibility it needs to stay on track. This private vs. public distinction is fundamental.
Since 2020, the use of Jira filters has exploded. Today, 95% of agile teams rely on them daily. In fact, enterprise audits in 2025 showed that users create over 1.2 filters per user every month. A typical workflow might be creating a query like assignee = currentUser() AND duedate < now(), saving it privately, and then sharing a broader one like status = Open with the entire organization. You can dig into more of these usage stats over on Atlassian's community forums.
Setting Up Clear Naming Conventions
Before you hit "Save," stop and think about the name. "Bug Filter" isn't going to cut it a week from now. A truly useful name should immediately answer three questions: What does this show? Who is it for? And is there a specific context?
Adopt a simple but effective naming convention like this:
- Team-Context-Content:
[Marketing] - Q3 Campaign - Blocked Tasks - Purpose-User-Scope:
[Report] - My Open Bugs - All Projects - Project-View-Status:
[Apollo] - Dev Team View - Ready for QA
A consistent structure makes your filters instantly searchable and easy to understand. It stops teammates from creating redundant queries and is a cornerstone of using Jira effectively at scale.
Mastering Filter Permissions
After you save a filter, Jira will ask you to set permissions for who can view and edit it. Don't just click through this step—it’s critical for controlling who sees what.
Key Insight: Filter permissions are not just about security. They're about reducing clutter and making sure the right people see the right information. Over-sharing creates a mess and buries the filters that actually matter.
Here’s an actionable guide to picking the right permission level:
- Private: This is the default. Use it for your personal to-do lists, one-off queries, or any filters you're still testing.
- Group: Share a filter with a specific set of people, like
apollo-dev-teamorqa-engineers. This is the best choice for team-specific boards and dashboards. - Project: Make the filter visible to everyone with access to a specific project. It’s great for cross-functional views, like a release readiness checklist involving multiple teams.
- Organization: Share the filter with every logged-in user in your Jira instance. Use this sparingly for globally relevant information, like a filter for ‘All Open Production Incidents.’
Getting permissions right is a huge part of good team alignment. When information flows to the right people at the right time, you’ll see a massive improvement in team collaboration and a lot less back-and-forth communication.
Putting Filters to Work on Boards and Dashboards
This is where you turn saved queries into the living core of your team’s daily workflow. A well-crafted filter is the engine that drives visibility, transforming raw data into real insights on the tools you use every single day—your boards and dashboards.
Without this step, a filter is just a saved search sitting in a list. By connecting it to a board or a dashboard gadget, you give it purpose and turn it into a command center for your team.
Powering Jira Boards with Custom Filters
Every Agile board in Jira, whether Scrum or Kanban, runs on a saved filter. That filter dictates exactly which issues show up. Many teams overlook this, sticking with the default "show me everything in the project" filter and missing out on a powerful feature.
By creating specific filters for your boards, you can build highly specialized views that solve frustrating team bottlenecks.
Here are two actionable ideas you can implement today:
- A Bug Triage Board: Create a filter
issuetype = Bug AND status = "Awaiting Triage". Hook this up to a new Kanban board to give your QA and product teams a dedicated space to prioritize incoming bugs, separate from the noise of other development work. - A Release Readiness Board: Build a filter like
fixVersion = "Q4-Release" AND status not in (Closed, Done). This gives stakeholders one clean, clear view of exactly how close you are to hitting your release milestone.
To change a board's filter, navigate to your board, click the three dots (…) in the top-right corner, and choose Board settings. From there, go to the General tab to edit the Filter that powers the entire board.
Visualizing Data on Dashboards
If boards are where the work gets done, dashboards are your project's mission control. And filters are what feed mission control with real-time data.
One of the most valuable gadgets you can add to any dashboard is the Filter Results gadget. It displays the live results of any saved filter you choose, giving you an immediate summary of what's most important.
For example, add a gadget to your team's main dashboard powered by a filter for "Stories Awaiting QA Handoff." Suddenly, everyone on the team can see the QA queue at a glance. This simple action smooths out handoffs and stops work from sitting idle.
Key Takeaway: Using filters on dashboards moves you from reactive project checking to proactive project monitoring. You start spotting potential problems as they develop, not after they've already caused a delay.
Dashboards aren't just for you; they're for communicating status without calling another meeting. By visualizing your filter data, you can create powerful, automated summaries that keep everyone in the loop. If you want to take this a step further and turn this data into polished summaries for stakeholders, check out our guide on how to create a report in Jira. It’s the perfect next step for getting even more value out of your filters.
Automating Workflows with Jira Filters
Saved filters are much more than just shortcuts to your data. They're the secret sauce for kicking off powerful automated workflows, saving your team from countless hours of mind-numbing manual tasks. By plugging your filters into Jira’s automation engine, you can stop creating static reports and start building dynamic, self-managing processes.
This flowchart shows how a single JQL filter can become the backbone for both visibility and automation across Jira.
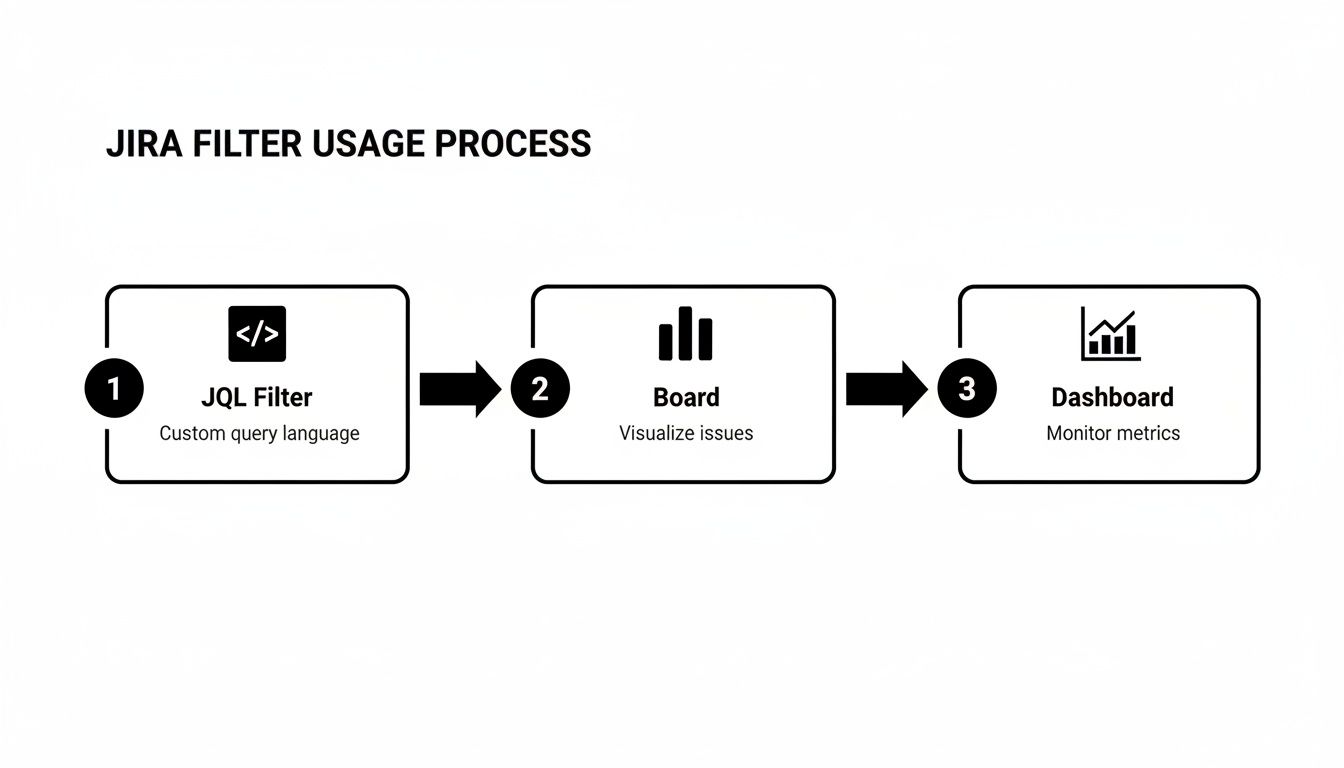
As you can see, a focused JQL query feeds into a saved filter, which in turn powers the boards and dashboards your team relies on for daily work and high-level reporting. It all starts with the filter.
Start Simple with Email Subscriptions
One of the easiest wins in Jira automation is subscribing to a filter. A subscription is just a scheduled email that sends the results of your saved filter to you or a group. It's a fantastic way to keep stakeholders in the loop without them ever having to log into Jira.
For instance, create a filter for all high-priority bugs and set it to automatically email a summary to your project manager every morning at 8 AM.
Here’s how to set it up:
- Navigate to your saved filter from the Filters menu.
- Click the Details button at the top of the page.
- Select + New subscription.
- Define the recipients (yourself, a group, a specific user) and the schedule (daily, weekly, etc.).
This simple action transforms a passive report into a proactive notification, ensuring critical info lands directly in the right inboxes.
Triggering Advanced Automations
Beyond simple email pings, saved filters can be the key condition for sophisticated automation rules. This is where you can truly bend Jira to your will, automating handoffs, status updates, and notifications.
Key Insight: When a filter is used as an automation trigger, you're not just finding issues—you're telling Jira to do something the moment an issue matches that criteria. This is the heart of a proactive, event-driven workflow.
Let's automate a common Dev-to-QA handoff. Create a filter named "Ready for QA" with a JQL query like this: status = "In Review" AND "Dev Complete[Checkbox]" = Checked.
From there, build an automation rule that runs on a schedule—say, every 15 minutes—and checks for any issues matching your "Ready for QA" filter. When it finds a match, it can automatically:
- Transition the status from "In Review" to "In QA."
- Reassign the issue from the developer to the QA lead.
- Post a notification in your team's Slack channel.
Just like that, the tedious manual handoff process is gone. It's completely automated, which cuts down on delays and ensures nothing ever falls through the cracks. This is just one example of building a smarter process, and you can dive much deeper into setting up these kinds of intelligent systems in our complete guide to Jira workflow automation.
And if you're looking to push Jira's capabilities even further with external tools, you might want to explore Zapier alternatives for AI automation to connect Jira to the rest of your tech stack.
Got Questions? Common Jira Filter Hurdles Solved
Even as you get comfortable with creating filters, a few common questions tend to pop up. Think of this as a quick troubleshooting guide for those little roadblocks that can get in the way of your workflow.
What’s the Real Difference Between a Filter and a Queue?
This is probably one of the most common points of confusion, especially if you spend time in Jira Service Management projects. They both show you a list of issues, so what gives?
Here’s the breakdown:
- A filter is your all-purpose, go-anywhere search. It’s a saved JQL or Basic search that you can plug into dashboards, boards, reports, and email subscriptions. It’s the foundational tool for finding and grouping issues across all of Jira.
- A queue is a specialized tool built specifically for Jira Service Management. It helps service teams triage and manage incoming requests, often with a focus on SLAs. While queues are built using JQL, they live exclusively within the service project.
The easiest way to think about it is this: every queue is powered by a filter, but not every filter is a queue. A queue is just a specific application of a filter designed for a service desk.
"My JQL Query Is Perfect, So Why Is It Showing Zero Results?"
We've all been there. You craft what feels like the perfect JQL query, hit enter with confidence, and… nothing. Zero issues found. It’s maddening, but the fix is usually simpler than you think.
When your query comes up empty, run through this mental checklist.
First, hunt for syntax errors. A tiny typo, like a missing quote or spelling assignee with one 's', can break everything. Jira's JQL editor is pretty good at flagging these with red squiggly lines, so pay attention to its hints.
Next, double-check your field values. Are you searching for status = "Done" when your workflow actually calls that status "Closed"? JQL needs an exact match. This is also a classic trip-up with usernames or component names; they have to be perfect.
My Go-To Debugging Trick: When a complex query fails, I strip it down to its simplest part (like
project = "PROJ"). If that works, I add back one condition at a time. The moment the results vanish, I've found the part of the query that's causing the problem.
Finally, don't forget about permissions. You can't find what you can't see. If your JQL is flawless and you know the issues exist, the problem might not be your query at all—it could be that you don't have the necessary project permissions to view those specific issues.
Ready to push your filters beyond just viewing issues? Harmonize Pro builds Nesty, an app that lets you use saved filters to trigger powerful, self-managing workflows directly inside a single Jira issue. Imagine turning a "Ready for QA" filter into an automated process that assigns checklists, notifies the right people, and enforces quality gates without any manual effort. See how you can build smarter, faster processes and keep your team perfectly in sync by exploring Nesty.
Leave a Reply